Tuesday, August 3, 2010

Celery Root Soup

Celeriac, also known as celery root or knob celery, is a kind of celery grown as a root vegetable for its large hypocotyl rather than for its stem and leaves. Unlike other root vegetables, which store a large amount of starch, celery root is only about 5-6% starch by weight. Celeriac has a celery flavor and is often used in soups and stews. It can also be mashed or used in casseroles, gratins, or baked dishes. Try this recipe, adapted from The Conscious Cook by Tal Ronnen. [Serves 6]
  • 3 tbsp. olive oil
  • 2 medium celery roots, peeled and cut into 1-inch cubes
  • 2 stalks celery, chopped
  • 1 large onion, chopped
  • 2 quarts broth
  • 1 bay leaf
  • 1 cup thick Cashew Cream* (see below)
  • freshly ground black pepper
  • 1 unpeeled Granny Smith apple, very finely diced (optional, for garnish)
Place a large stockpot over medium heat. Sprinkle the bottom with a pinch of salt and heat for 1 minute. Add the oil and heat for 30 seconds, being careful not to let it smoke. This will create a nonstick effect.

Add the celery root, celery, and onion and sauté for 6-10 minutes, stirring often, until soft but not brown. Add the stock and bay leaf, bring to a boil, then reduce the heat and simmer for 30 minutes. Add the cashew cream and simmer for an additional 10 minutes.

Working in batches, pour the soup into a blender, cover the lid with a towel (the hot liquid tends to erupt), and blend on high. Season with salt and pepper to taste. Ladle into bowls. Place a spoonful of the diced apple in the center of each serving.

*To make 1 cup of Cashew Cream, place 2/3 cup whole raw cashews (not pieces, which are often dry), rinsed very well under cold water, in a blender with enough fresh cold water to cover them by 1 inch. Blend on high for several minutes until very smooth. Cashew cream is a vegan-chef staple and can be stored 2-3 days in the refrigerator or in the freezer for up to 6 months (although after it's defrosted it can be a bit lumpy, so it's good to give it a spin in the blender to smooth it out before using it).

Photo courtesy of Wikipedia

Thursday, July 15, 2010

Yellow squash soup w/cinnamon & cloves

It not much of a recipe – mostly guesswork – but it came out pretty good:
    • Sautee garlic and onion w/butter, salt, cinnamon, rosemary in large pot or skillet
    • Add cubed squash, honey/brown sugar, cloves cook under a lid until tender
    • Add small amounts of water as needed
    • Remove cloves
    • Puree in blender

    Tuesday, July 6, 2010

    Ridiculously simple broccoli (or broccoli stalk) soup

    Not sure what to do with your broccoli stems? Try this recipe - it's incredibly easy, and delicious!
    • Broccoli (florets and/or stems)
    • Salt & pepper
    • Olive oil
    • Garlic (optional)
    • Carrots (optional)
    • Goat cheese (optional)
    • Toasted almonds or walnuts (optional)
    Sautee chopped garlic and olive oil in a soup pot. Add water to pot, bring to boil, season w/salt and pepper. Add broccoli stalks and carrots. Cook until tender. Blend. Season again. Enjoy!

    Gordon Ramsey's version uses florets, goat cheese and walnuts: http://www.youtube.com/watch?v=Mvc8Au4YO60

    Tuesday, June 29, 2010

    Arugula and Spinach Stir-Fry (with a bonus lesson on herb-infused oils!)

    People are always looking for ways to use up spring and summer greens. This recipe, from one of our CSA members, is another great one to have on hand.

    But first, let me talk about one of the ingredients in this recipe: sweet-basil-infused olive oil. Infused olive oils can be very expensive and often found only at specialty stores. However, they can be made very easily and cheaply at home. I actually prefer to make it myself because you can control what types and how much of every flavor goes in. Plus, you can come up with your own herb combinations and get really creative! And an added bonus: bottles of your own herb-infused oils make wonderful gifts.

    Use about 1/4 cup of fresh herbs for every cup of olive oil. You can roughly chop the herbs to help release the flavor, or leave them whole (especially if you want to leave the herbs in the bottle for decoration). Heat the oil up to about 200 degrees F (I use a candy thermometer clipped to the side of the pan for this) with the herbs included. Cook at this temperature for 10 minutes. Remove from heat, strain herbs if desired, and pour into a sterilized glass bottle. I recommend not using a jar with a wide opening for easier pouring, and not using anything with a metal top - this might add a metallic taste to your oil. Use a bottle with a plastic or cork topper and make sure that the opening is completely sealed. Let sit for about 48 hours before using. If you add raw herbs to your oil as decoration after cooking, make sure to refrigerate - the water content of the herbs can promote bacterial growth in room temperature oil. If you do not add raw herbs, you can store your oil in the fridge or with your other oils at room temperature.


    Arugula and Spinach Stir-Fry

    Courtesy of Jed Fahey

    Use about two cups of spinach and two cups of arugula, coarsely chopped. Heat sweet-basil-infused oil in a wok, and add arugula and spinach, sauteing for about one minute. Add 1/4 cup amontillado sherry and 1/4 cup white balsamic vinegar, and then steam it down for another minute or two. Serve with couscous, quinoa, or any one of your favorite starches!


    Photos courtesy of Benjamin Chun, sweet mustache (respectively) - Flickr.com

    Sunday, June 13, 2010

    Corn and Radish Salad

    Adapted from Food Everyday: From the Kitchens of Martha Stewart Living (2007):

    Coarse salt
    4 ears corn (substitute with 2 cups frozen corn)
    6 radishes, trimmed, halved and thinly sliced (or finely chopped in a food processor)
    1 jalapeno chile, finely chopped (or substitute with hot sauce)
    2 tablespoons fresh lime juice
    1 tablespoon olive oil

    After cooking the corn in boiling salted water until tender, slice the kernels from the cobs (to yield about 2 cups). Toss with the radishes, jalapeno, lime juice and olive oil. Season with salt. Serve chilled or a room temperature.

    When I tried this recipe, I used frozen corn instead of fresh corn. It was tasty, though the corn seemed a bit mushy. Once fresh corn is in season, I might try this with raw or undercooked corn to preserve some of the crispness.

    This is a great way to utilize a hefty bunch of radishes!

    Wednesday, June 9, 2010

    Palak Paneer (spinach)

    I used two shares worth of spinach (I traded in my garlic scape for a 2nd spinach, via the handy new swap-box feature) to make Palak - minus the Paneer, since I didn't have any cheese. Delicious! Tonight, if I'm feeling adventurous, I may try the same recipe but with chard instead.

    From allrecipes.com: http://allrecipes.com/Recipe/Absolutely-Perfect-Palak-Paneer/Detail.aspx

    6 tablespoons olive oil
    2 cloves garlic, chopped
    1 tablespoon grated fresh ginger root
    2 dried red chile peppers
    1/2 cup finely chopped onion
    2 teaspoons ground cumin
    1 teaspoon ground coriander
    1 teaspoon ground turmeric
    3/4 cup sour cream
    3 pounds fresh spinach, torn
    1 large tomato, quartered
    4 sprigs fresh cilantro leaves
    8 ounces ricotta cheese
    Salt to taste

    In a large saucepan heat 3 tablespoons of olive oil and saute garlic, 1/2 tablespoon of ginger, red chilies (optional ingredient) and onion until brown. Mix in the cumin, coriander, turmeric and sour cream (add more or less to achieve desired creaminess). Add the spinach, handfuls at a time until it is cooked down, about 15 minutes total. Remove from heat and allow to cool slightly.

    Pour spinach mixture into a blender or food processor and add the tomato, the remaining 1/2 tablespoon of ginger, and cilantro (add more or less according to taste). Blend for 15 to 30 seconds, or until the spinach is finely chopped. Pour back into the saucepan and keep warm over low heat.

    In a medium frying pan heat 3 tablespoons of olive oil over medium heat, and fry cheese until browned; drain and add to spinach. Cook for 10 minutes on low heat. Season with salt to taste.

    - Brent

    Monday, November 16, 2009

    Have A Happy, Healthy, and Green Thanksgiving!


    No, I don't mean you should celebrate Dr. Seuss-style and dye your Thanksgiving turkey green. There are less extravagant ways, though, to green up your table this holiday season - specifically your holiday dinner table. The central focus of Thanksgiving is always the turkey (how about a tofurkey this year?), but the vegetable side dishes and desserts can be just as attention-grabbing and delicious as the main course. Below are some of my favorite Thanksgiving side dishes and desserts that focus on local, in-season foods - and just happen to be vegan! Don't let that fool you though, a pumpkin pie with tofu in it can be just as scrumptious as one with dairy. Give these a try this holiday season, and your family and friends (and the earth!) will all be thanking you.

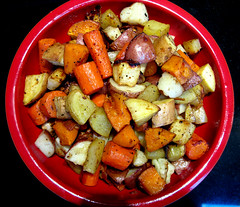
    Roasted Winter Vegetables

    2-3 medium parsnips, peeled and cut into 1-inch thick slices
    2-3 turnips, peeled and cut into 1-inch thick slices
    2-3 carrots, peeled and cut into 1-inch thick slices
    A few handfuls of Brussels sprouts, halved
    5-7 smallish white, red, or purple potatoes, cut into 1-inch thick slices
    1-2 sweet potatoes, peeled and cubed
    Enough olive oil to fully coat vegetables
    Sage, thyme, oregano, rosemary, salt, and pepper, to taste

    Directions: Preheat the oven to 400 degrees F. Coat a shallow, large baking dish with olive oil. Place all sliced vegetables in a mixing bowl and add desired herbs and spices. Fully coat vegetables with olive oil, tossing together well. Transfer the vegetables to the baking dish, spreading out evenly. Roast for 30-40 minutes, stirring the vegetables once or twice.

    Vegetarian Gravy
    Courtesy of vegweb.com
    1 vegetable bullion cube
    2 cups water
    1/2 teaspoon onion powder
    few good dashes garlic powder
    2 heaped tablespoon nutritional yeast
    few good dashes of soy sauce or tamari (add more or less for your tastes)
    1/2 teaspoon mustard
    1/4 - 1/2 cup flour (start with less until it's as thick as you would like it. I use brown rice flour in mine.)
    1 tablespoon vegan butter (this adds to the richness)
    sea salt and pepper to taste

    Directions: Combine all ingredients in pot, and bring to boil. Cook on medium low heat until done.

    Apple Pie
    Courtesy of ‘The Joy of Vegan Baking’
    1 package pre-made pie crusts (or you can make your own crust if you have the time!)
    5-6 medium-large apples, peeled, cored, and sliced ¼-inch thick*
    ½ cup sugar
    2-3 tablespoons all-purpose flour
    1 tablespoon fresh lemon juice
    ¾ teaspoon ground cinnamon
    ¼ teaspoon ground nutmeg
    Pinch of salt
    2 tablespoons nondairy butter, cut into small pieces
    2 teaspoons sugar (for sprinkling on crust)
    1/8 teaspoon ground cinnamon (for sprinkling on crust)

    *Certain apples are much better than others for baking. I suggest using Empire, Golden Delicious, Gravenstein, Newton Pippin, Winesap, Crispin, or Granny Smith apples. Fuji, Gala, Braeburn, McIntosh, Pink Lady, and Red Delicious are usually the most common in grocery stores, but do not do very well in pies.

    Directions: Roll out your bottom dough into a 13-inch round and fit it into a 9-inch pie pan. Trim the overhanging dough to ¾ inch all around. Place in the refrigerator while you prepare the filling. Roll out the dough for the top crust, fold it in half, cover, and place in the refrigerator as well. Preheat the oven to 425 degrees F. Combine your sliced apples with the sugar, flour, lemon juice, cinnamon, nutmeg, and salt. Let it stand for 10 to 15 minutes while the apples soften slightly. Pour the mixture into the bottom crust and gently level it with the back of a spoon. Dot the top with the pieces of nondairy butter. Brush the overhanging crust with cold water. Cover with the top crust, and tuck any excess pastry under the bottom crust. Crimp the edges using your fingers or a fork. Using a sharp knife or skewer, make 5 slits from the center of the pie out toward the edge of the pie to allow the steam to escape. Sprinkle with sugar and cinnamon and bake for 30 minutes. Slip a baking sheet underneath (to catch the juices), reduce the temperature to 350 degrees F, and bake until the fruit feels just tender when a knife is poked through a steam vent, or 30 to 45 minutes. Remove the pie from the oven and place on a wire rack to cool for 3 to 4 hours before cutting. This allows the filling to thicken properly. If you’d like to serve it warm, place it in the oven at 350 degrees F for about 15 minutes. Though it will keep for a few days (on the counter – not in the fridge), I think it’s best served the day it’s baked.

    Pumpkin Pie
    Courtesy of ‘The Joy of Vegan Baking’

    1 pie crust
    16 pecan halves (optional)
    12 ounces silken tofu (firm)
    2 cups pumpkin puree
    ½ cup pure maple syrup
    ½ cup firmly packed light brown sugar
    ¼ cup cornstarch
    1 ½ teaspoons ground cinnamon
    ½ teaspoon salt
    ¼ teaspoon freshly grated nutmeg
    ¼ teaspoon ground ginger
    1/8 teaspoon ground cloves

    Directions: Preheat the oven to 350 degrees F. Prepare your pie crust or remove a store-bought crust from the freezer/refrigerator. Spread the pecans, if using, on a cookie sheet. Toast for 7 to 10 minutes, or until the smell of nuts fills the kitchen. Set aside for a garnish. In a food processor, blend together the tofu, pumpkin puree, maple syrup, brown sugar, cornstarch, cinnamon, salt, nutmeg, ginger, and cloves until the mixture is completely smooth and creamy. You may have to scrape down the sides of the bowl a few times. Pour the filling into the baked crust, and smooth the top with a spatula. Bake for about 40 to 45 minutes, or until the crust is lightly browned and the outermost inch of the filling is set. Don’t worry if the center is still soft; it continues to firm up as the pie cools. Transfer the pie to a wire rack. Gently press the 16 toasted pecan halves into the filling in any design you like. Cool to room temperature and then chill until set, 1 to 2 hours. Serve chilled or at room temperature.